I really like cheese.
After some cheese based internet cruising I realised that I could realistically make some myself and so I set forth on a mission to curdle myself a brick of paneer. Since it is easy, cheap and fun (for those who don't get grossed out by things that look like vomit) I have decided to share with you, the joy of curdling.
SCIENCE BIT
Curdling. That thing you accidentally do during cooking when you add cold milk to hot things or when you leave milk in the fridge for so long that it gets a little chunky. Curdling milk is a necessary first step to make all cheeses. It occurs because, on addition of acid (lemon juice, vinegar or from the product of bacteria), the milk coagulates, no longer existing as a nice stable emulsion anymore but separating out into curds (solid) and whey (liquid). When you mix oil and water, an emulsion, eventually the oil will rise to the surface; this is the same with curdling as the more buoyant curds will float up and sit atop the watery whey, hoorwhey! For cheeses that wish to be hard, rennet must be added (extract of calf stomach), forming more cohesive curdling action via the action of enzymes. These cheeses go on to be inoculated with mould and what not but here I will simply demonstrate curdling cow's milk, with lemon juice, to form paneer, a simple cheese used in indian cookery (bit like solidified cottage cheese).
COOKING BIT
Step 1: Heat up a large amount of full fat milk (and only full fat). I used 4 pints. Use a medium heat and keep stirring or it may burn on the bottom (if this happens don't scrape it off, this will make things worse). At this stage you can add herbs/spices if you fancy.
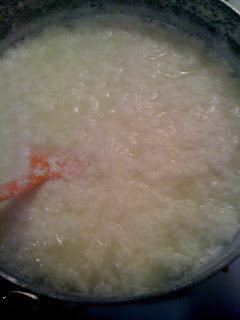
Step 2: Once the milk is properly boiling (before this happens the milk might balloon into a giant dairy cloud so be ready to turn the heat down) add about half a lemon's worth of juice and stir gently. It should start to look disgusting, as shown in the picture. It should progress through the vomit stage (below) and start to look more lumpy, like overcooked scrambled eggs. If this doesn't happen add more lemon juice (shouldn't need more than 1 lemon if using 4 pints). If desired curdling has not been achieved, you may need to start again (this can happen if the milk is not hot enough).
Step 3: Pour the appealing mixture through a piece of muslin (try Kitchens, Whiteladies Road) sat in a colander and give it a rinse with cold water until the mixture is cool enough to handle. Give it a good squeeze to get out excess whey, wrap it up in the cloth tightly and sit a weight on top (big pan with tins in should do it).


2 comments:
Looks lovely - not the vomit photo OBV but the frying one. Very impressed xx
Loved reading this thank youu
Post a Comment